Team Management
Team Management is where you add members to your agency, decide who's an admin, assign roles, and keep their information up to date. This guide walks through the complete workflow for managing your team.
Complete these setup steps first:
- Agency Profile — Set your timezone
- Certification Templates — Create templates for certifications
- Positions & Ranks — Define organizational structure
This ensures new members can immediately add certifications and be assigned positions/ranks.
Accessing Team Management
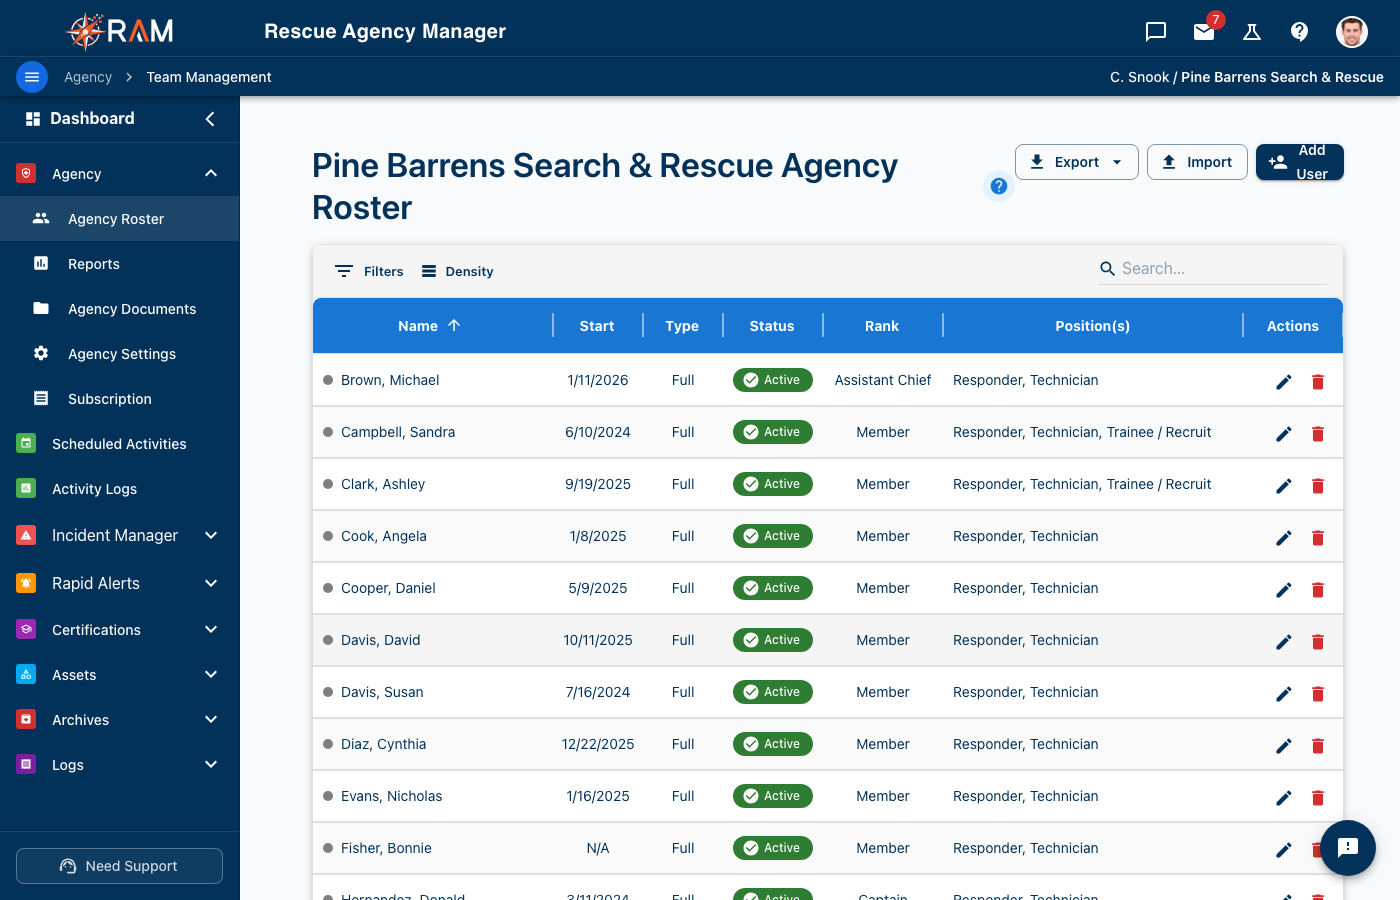
Navigate to Team Roster in the left menu to view and manage your team members.
Required Permissions: Administrator or Membership Manager
Seat Availability
Your subscription plan determines how many team members you can add.
| Indicator | Meaning |
|---|---|
| Green info bar | More than 3 seats available |
| Yellow warning | 3 or fewer seats remaining |
| Red error | No seats available — upgrade required |
When you're out of seats, the Add Member button is disabled. Click the upgrade link to increase your plan.
Adding a New Team Member
Step 1: Start the Process
- Go to Team Roster
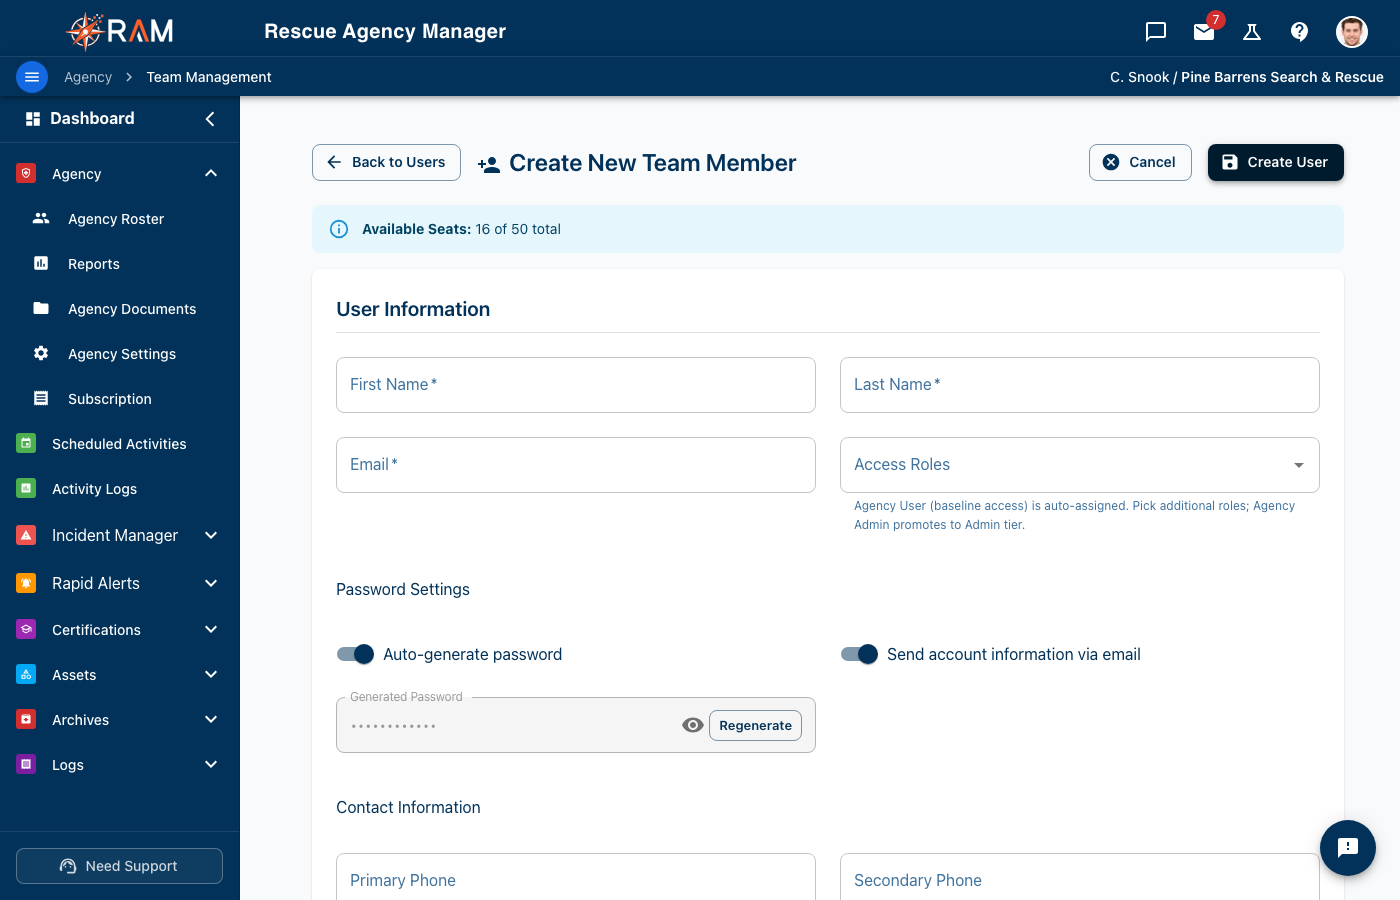
- Click Add User (upper right)
Step 2: Enter Required Information
| Field | Required | Description |
|---|---|---|
| First Name | Yes | Member's first name |
| Last Name | Yes | Member's last name |
| Yes | Must be unique — used for login | |
| Access Tier | Yes | Admin or User (see Access Tiers and Roles below) |
Step 3: Configure Password
Choose how the member will get their password:
Option A: Auto-Generate (Recommended)
Toggle Auto-generate password to ON (default):
- RAM creates a secure 12-character password
- Password includes letters, numbers, and special characters
- Click Regenerate to create a new random password
- Click the eye icon to view the generated password
Option B: Manual Password
Toggle Auto-generate password to OFF:
- Enter a password in the Password field
- Confirm it in the Confirm Password field
- Passwords must match
Auto-generate is recommended because:
- Creates strong, random passwords
- Reduces password reuse
- Member must change it on first login anyway
Step 4: Email Notification
Toggle Send account information via email to control whether RAM sends the member an invitation email:
| Setting | Behavior |
|---|---|
| ON (default) | Member receives email with login credentials |
| OFF | No email sent — you must share credentials manually |
The invitation email includes:
- Welcome message
- Login credentials (email and password)
- Link to the application
- Instructions to change password
Step 5: Add Contact Information (Optional)
| Field | Description |
|---|---|
| Primary Phone | Main contact number |
| Secondary Phone | Backup contact number |
| Address Line 1 | Street address |
| Address Line 2 | Apartment, suite, unit |
| City | City name |
| State | Select from dropdown |
| ZIP Code | Postal code |
Step 6: Set Membership Details
| Field | Options | Description |
|---|---|---|
| Membership Type | Probationary, Associate, Full, Lifetime, Honorary | Classification of membership |
| Member Status | Active, Inactive, On Leave, Suspended, Pending | Current standing |
| Account Active | Toggle | Controls login access |
Default values:
- Membership Type: Full
- Member Status: Active
- Account Active: On
Step 7: Add Emergency Contact (Optional but Recommended)
| Field | Description |
|---|---|
| Emergency Contact Name | Who to call in an emergency |
| Emergency Contact Phone | Their phone number |
| Relationship | Spouse, Parent, Sibling, etc. |
Emergency contact information is critical for rescue organizations. Encourage all members to provide this.
Step 8: Save
Click Create User to save the new member.
What happens next:
- Member account is created
- Storage allocation is set up
- Invitation email is sent (if enabled)
- You're redirected to the roster
- Success message confirms creation
Member Access Tiers and Roles
RAM has two layers of access control:
Access Tier
When creating a member you choose their access tier — Admin or User:
| Tier | Description | Typical Use |
|---|---|---|
| Admin | Full access to all agency settings, members, and data. Bypasses all permission checks. | Agency leadership, system administrators |
| User | Access is controlled by the Roles assigned to this member | Regular team members |
| Capability | Admin | User |
|---|---|---|
| View own profile | Yes | Yes |
| Edit own certifications | Yes | Yes |
| View team roster | Yes | Based on roles |
| Add new members | Yes | Based on roles |
| Edit agency settings | Yes | No |
| Manage subscriptions | Yes | No |
| Manage member roles | Yes | No |
| Delete members | Yes | No |
RAM prevents you from removing Admin access from the last Admin in your agency. Your agency must always have at least one Admin.
Roles
For regular (non-admin) members, what they can do is controlled by Roles — named bundles of related permissions. Every new member is automatically given the Agency User starter role, which lets them view most areas of the app (inventory, the team roster, training records, activities, documents, and chat) without changing anything.
To expand what a member can do, assign additional roles:
| Role | Key capabilities granted |
|---|---|
| Inventory Manager | Create, edit, delete, checkout, transfer, retire, and audit assets |
| Training Manager | Manage certifications, templates, activities, and attendance |
| Operations Manager | Manage incidents, send alerts, manage alert device licenses |
| Membership Manager | Invite members, edit profiles, manage chat channels |
| Member Medical Manager | View and manage member health records |
| Animal Medical Manager | View and manage animal health records |
| Animal Manager | View and manage animal profiles |
A member can hold as many roles as you want. Their access is the combined total of every permission those roles grant.
To assign roles to a member:
- Go to Agency Settings → Organization → Roles
- Find the role you want to assign
- Click Assign on that role's row
- Search for the member by name or email and select them
- Click Assign to confirm
The member gains the role's permissions immediately.
To see which roles a member has:
Open the member's profile (from Team Roster, click their name). The Access Roles card lists all assigned roles. Clicking a role chip shows the individual permissions it grants.
See Roles & Permissions for the complete role and permission reference.
Membership Types
Customize membership types to match your organization's structure:
| Type | Typical Use |
|---|---|
| Probationary | New members in training/evaluation period |
| Associate | Limited participation members |
| Full | Regular active members (default) |
| Lifetime | Members with permanent status |
| Honorary | Recognition-based membership |
Member Status
| Status | Meaning | Login Access |
|---|---|---|
| Active | Currently participating | Yes |
| Inactive | No longer participating | No |
| On Leave | Temporary absence | Configurable |
| Suspended | Disciplinary or administrative hold | No |
| Pending | Awaiting approval or completion | Configurable |
Viewing the Team Roster
The roster displays all team members in a table format:
Displayed Information
- Name
- Email address
- Role (Admin/User)
- Membership Type
- Status
- Last login date
Filtering Options
Filter the roster to find specific members:
| Filter | Options |
|---|---|
| Role | Admin, User |
| Membership Type | Probationary, Associate, Full, etc. |
| Status | Active, Inactive, On Leave, etc. |
| Search | Name or email |
Sorting
Click column headers to sort by:
- Name (A-Z or Z-A)
- Role
- Status
- Last login
Editing Team Members
Access the Edit Page
- Find the member in the roster
- Click their name or the edit icon (pencil)
Editable Information
The edit page has multiple tabs:
Member Info Tab
- First name, last name
- Email (changing email affects login)
- Phone numbers
- Address
- Membership type and status
- Account active toggle
- Emergency contact
Positions & Ranks
- Assign Rank (single selection)
- Assign Positions (multiple selection with checkboxes)
Other Tabs
- Certifications
- Specialties
- Documents
- Activity history
Saving Changes
- Make your edits
- Click Save at the bottom of the page
- Success message confirms the update
Deactivating Members
When a member leaves your organization:
Option 1: Change Status to Inactive
- Edit the member's profile
- Change Member Status to "Inactive"
- Save
Effect: Member cannot log in but their data is preserved.
Option 2: Toggle Account Active Off
- Edit the member's profile
- Toggle Account Active to OFF
- Save
Effect: Immediate login access removal.
Deactivating a member preserves:
- Certification records
- Training history
- Activity logs
- Asset assignment history
This is important for compliance and historical reporting.
When to Archive vs. Deactivate
| Scenario | Action |
|---|---|
| Member left the organization | Archive (frees their seat) or Deactivate (keeps them on the roster) |
| Member on temporary leave | Change status to "On Leave" |
| Account created by mistake | Archive, then Delete permanently from Archived Members |
| Need to free up a seat | Archive — deactivating does not free a seat |
Archiving Members
The trash-can icon on the roster archives a member. It does not delete them. Archiving:
- Removes them from the roster and frees their seat
- Blocks their login
- Keeps their service record — their name stays on every incident roster, sign-in sheet, activity log, training hour and certification they were part of. That is your agency's record, and it is never removed automatically.
Archived members are listed under Archives › Archived Members, where an admin or Membership Manager can Restore them to the roster at any time.
What happens to their personal details
An archived member's personal details — home address, phone numbers, date of birth, emergency contacts, profile photo and login — are removed automatically after a retention window your agency sets. The default is one year. Admins receive reminder emails 30, 7 and 1 days before.
The window is set under Agency Settings › System › Data Retention. You can choose 90 days, 180 days, 1, 3 or 7 years, or keep personal details forever. See Agency Settings.
Privacy law expects you to keep personal data only as long as you have a reason to. A year covers a member who might return; after that, their address and next-of-kin serve no purpose to the agency. Their service history is a different matter — that is your record, and it stays.
A member who comes back
Restore them from Archived Members. Their history continues on the same record:
- Before their personal details were removed — they are back exactly as they were.
- After — you enter their email address; they receive an invitation to sign in and fill in their profile again. Their incidents, hours and certifications are all still attached.
There is no "merge" step. A returning member is always restored onto their own record rather than created as a new one.
Deleting a member permanently
Only an Admin can delete an archived member entirely, from Archived Members (the red icon). This removes the member and their whole history — incident participation, activity logs, certifications, files — and cannot be undone. It is recorded in the audit log.
Use it for an erasure request from the member, or an account created by mistake. If all you want is their personal details gone, you don't need it: that happens on the retention schedule while the record is kept.
Resending Invitations
If a member didn't receive or lost their invitation:
- Find the member in the roster
- Click the options menu (three dots)
- Select Resend Invitation
A new invitation email is sent with fresh login credentials.
Password Resets
Member-Initiated Reset
Members can reset their own password:
- Go to the login page
- Click Forgot Password
- Enter email address
- Check email for reset link
- Create new password
Admin-Initiated Reset
Admins can reset a member's password:
- Edit the member's profile
- Click Reset Password
- Choose to auto-generate or set manually
- Save
The member will need to change the password on next login.
Bulk Operations
Import Members via CSV
For adding multiple members at once:
- Go to Team Roster
- Click Import (if available)
- Download the CSV template
- Fill in member information
- Upload the completed CSV
- Review and confirm the import
Required CSV columns:
- First Name
- Last Name
- Role
Optional columns:
- Phone
- Address fields
- Membership Type
- Member Status
Export Roster
To export your team roster:
- Go to Team Roster
- Click Export
- Choose format (CSV or PDF)
- Download the file
Best Practices
When Adding Members
- Use work/organization emails — Avoid personal email addresses when possible
- Enable auto-generate passwords — More secure than common passwords
- Send invitation emails — Let RAM handle credential delivery
- Add emergency contacts — Critical for rescue operations
- Set correct membership type — Helps with reporting and filtering
Maintaining the Roster
- Regular audits — Review roster quarterly to identify inactive members
- Update contact info — Encourage members to keep details current
- Deactivate promptly — Remove access when members leave
- Don't delete — Preserve history by deactivating instead
Security
- Limit Admin tier — Only give Admin to those who need full system access
- Use Roles to fine-tune User access — Assign only the roles each member genuinely needs; avoid giving everyone every role
- Monitor last login — Identify accounts that may need attention
- Review roles periodically — Check Agency Settings → Organization → Roles to audit who holds each role
Troubleshooting
"No seats available"
Your subscription has reached its member limit. Options:
- Upgrade your subscription plan
- Deactivate or delete unused accounts to free seats
"Email already exists"
Each email address can only be used once. Either:
- Use a different email address
- Find and edit the existing account with that email
"Member didn't receive invitation"
- Check spam/junk folder
- Verify the email address is correct
- Resend the invitation
- Check if your agency's emails are being blocked
"Cannot remove Admin access from this member"
You're trying to demote the last Admin-tier member to User. Your agency must have at least one Admin. Either:
- Promote another member to Admin first (assign them the Agency Admin role)
- Keep this member as Admin
Next Steps
After adding team members:
-
Assign Certifications — Have members add their certifications
-
Assign Roles — Grant specific access to User-tier members from Agency Settings → Organization → Roles
-
Assign Specialties — Link members to their specialty roles