Asset Management
RAM's Asset Management system helps rescue organizations track equipment, gear, vehicles, and supplies throughout their lifecycle — from acquisition to retirement.
Asset Management is available on Professional and Enterprise plans. Contact your administrator to enable this feature.
Overview
The asset management system provides:
- Complete Inventory Tracking — Know what you have and where it is
- Assignment Management — Track who has what equipment
- Expiration & Maintenance Alerts — Never miss an inspection or renewal
- QR Code Access — Scan to view asset details instantly
- Storage Hierarchy — Organize by facility, area, section, and bin
- Mobile Asset Support — Track gear stored in vehicles and trailers
Getting Started with Assets
Before creating assets, complete these setup steps:
- Enable Assets in Agency Settings → Features
- Create Asset Types in Asset Settings (see below)
- Set up Storage Locations in Assets → Storage Locations (optional but recommended)
Asset Types
Asset Types categorize your inventory and determine what fields and tracking options are available.
Adding Asset Types
👉 Go to Asset Settings → Asset Types
RAM provides a library of common asset types you can add with one click:
| Category | Examples |
|---|---|
| Communications | Radio (Handheld), Radio (Mobile), Repeater, Satellite Phone |
| Medical | AED, First Aid Kit, Oxygen Kit, Trauma Kit, Medical Supply Bag |
| Rescue Equipment | Rope, Harness, Carabiner, Litter, Stokes Basket |
| Vehicles | Truck, ATV, UTV, Boat, Trailer |
| Technology | GPS Unit, Drone, Laptop, Camera, Night Vision |
| Protective Gear | Helmet, PFD, Turnout Gear, Safety Glasses |
Creating Custom Asset Types
If the library doesn't have what you need, create a custom type:
- Click Create Custom Type
- Enter the type name and description
- Select a category (organizational only — categories no longer control which fields appear)
- On the Compliance Defaults step, configure compliance tracking:
| Compliance Default | Description |
|---|---|
| Requires Insurance | Track insurance policy and expiration |
| Requires Registration | Track registration documents |
| Requires Calibration | Equipment needing periodic calibration |
| Requires Usage Log | Track usage hours, deployments, or per-session entries |
| Tracks Lifecycle | Track manufacture / first use / expiration / retirement dates |
| Tracks Life-Safety Specs | Capture certification standard, MBS, retirement criteria |
- On the Capabilities step, configure structural tracking:
| Capability | Description |
|---|---|
| Tracks Subcomponents | Asset has subcomponents (e.g., a rescue kit with multiple items) |
| Tracks Storage | Asset can hold other assets in its own Areas/Sections/Bins (vehicles, boats, trailers, gear caches) |
| Tracks Vehicle Specs | Captures VIN, make, model, year, mileage, etc. |
| Tracks Boat Specs | Hull ID, length, propulsion, registration |
| Tracks Trailer Specs | Hitch type, GVWR, axles |
| Tracks Rope Specs | Length, diameter, breaking strength, retirement date |
The compliance and capability flags set the default for new assets of this type. Per-asset overrides on each individual asset (the track_* toggles in the asset's Compliance Tracking section) are the actual enforcement on save — admins can opt a single asset out of, say, registration tracking even if its type requires it by default.
RAM's seed defaults now flip Requires Usage Log on by default for trailers, rope-rigging hardware (harness, carabiner, pulley, descender, ascender, anchor hardware, edge protection, webbing), helmets, life-safety PPE (PFD, dry suit, turnout gear, avalanche beacon/airbag), high-value optics, patient-contact medical equipment, body cameras, and fire ops nozzles / foam systems. New agencies inherit the new defaults; existing agencies have the same updates applied automatically. Per-asset overrides still let admins opt any specific asset out.
Asset ID Configuration
RAM can automatically generate unique IDs for your assets.
👉 Go to Asset Settings → Asset ID Configuration
Configuration Options
| Setting | Description |
|---|---|
| Auto-Generation | Enable/disable automatic ID creation |
| Default Prefix | Text before the number (e.g., "ASSET", "RAM") |
| Format Pattern | How IDs look (e.g., PREFIX-### → ASSET-001) |
| Number Padding | Digits in the number (3 = 001, 4 = 0001) |
| Type-Specific Prefixes | Different prefixes per asset type (RADIO-001, MED-001) |
Type-Specific Prefixes
For better organization, assign different prefixes to different asset types:
| Asset Type | Prefix | Example ID |
|---|---|---|
| Radio | RADIO | RADIO-001 |
| Medical Kit | MED | MED-001 |
| Rope | ROPE | ROPE-001 |
| Vehicle | VEH | VEH-001 |
Storage Locations
Organize where assets are stored using a hierarchical structure.
👉 Go to Assets → Storage Locations in the left sidebar
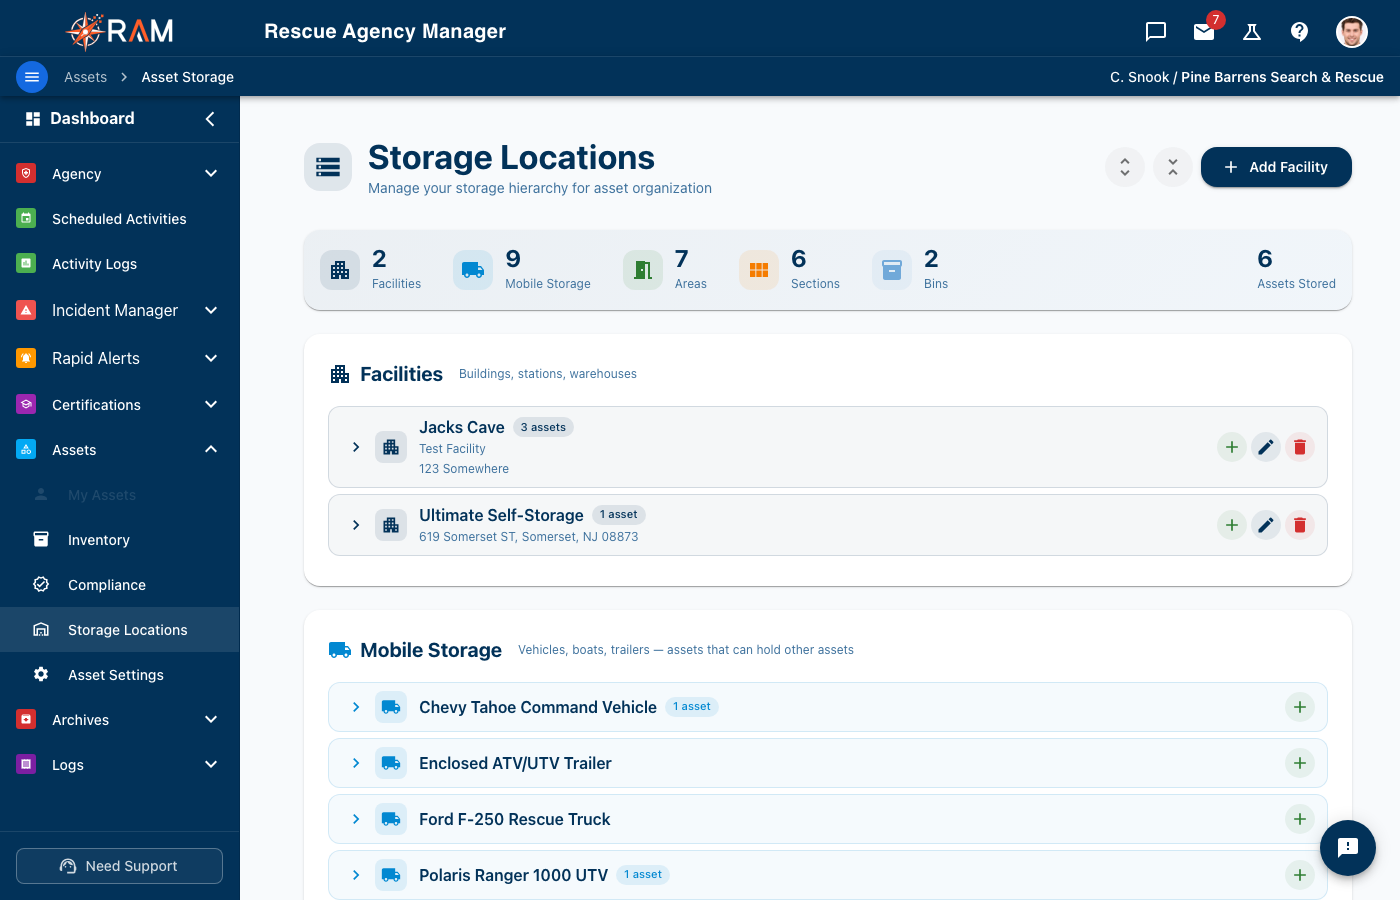
Storage Locations used to live under Agency Settings → Assets. It is operational data rather than agency configuration, so it is now its own page in the Assets section. Old bookmarks still work — they redirect to the new page.
Who can use it
| You have | You can |
|---|---|
| Inventory — View | Open the page and browse the whole storage hierarchy, read-only |
| Inventory — Edit | Create, rename, move, and delete facilities, areas, sections, and bins |
Being able to create an asset does not by itself let you change the storage structure — that requires edit access.
Storage Hierarchy
Facility (e.g., "Main Station", "Training Center")
  └── Area (e.g., "Gear Room", "Truck Bay")
        └── Section (e.g., "Shelf A", "Cabinet 1")
              └── Bin (e.g., "Bin 12", "Drawer 3")
Creating Storage Locations
- Create Facilities — Your buildings or locations
- Add Areas — Rooms or zones within facilities
- Add Sections — Specific storage units within areas
- Add Bins — Individual compartments (optional)
Mobile Assets as Storage
Vehicles, boats, trailers, and other storage-capable assets can serve as storage roots for the gear they carry:
- Create the asset (e.g., a fire engine, rescue boat, gear-cache trailer)
- Make sure its Asset Type has Tracks Subcomponents enabled, or that the asset itself has been marked storage-capable
- From the asset's edit page, open the Internal Storage section in the left rail and add Areas, Sections, and Bins under it — same hierarchy as a facility
- Assign other assets to a specific bin / section / area inside this asset
- When the mobile asset moves, every asset stored anywhere in its hierarchy moves with it
The Storage Locations page also shows every storage-capable asset alongside facilities, so admins can manage the full structure from one place.
Assets → Storage Locations is the agency-wide tree — your buildings, plus every vehicle/boat/trailer that can carry gear. Internal Storage, inside a single storage-capable asset, is the same kind of hierarchy scoped to just that asset. Edits in either place update the same underlying structure; the asset page is simply a focused view of one branch.
If you try to archive a fire engine, boat, or trailer that still contains assets in its Areas/Sections/Bins, RAM blocks the archive and prompts you to transfer or remove the stored assets first. This prevents stored assets from being orphaned inside an archived parent.
Creating Assets
👉 Go to Inventory → Add Asset
Required Information
| Field | Description |
|---|---|
| Asset Type | Select from your configured types |
| Name | Descriptive name (e.g., "Radio #5", "Primary AED") |
| Agency Asset ID | Auto-generated or manual entry |
Optional Information
| Field | Description |
|---|---|
| Serial Number | Manufacturer's serial number |
| Purchase Date | When acquired |
| Purchase Price | Original cost |
| Current Value | Depreciated value |
| Warranty Expiration | End of warranty period |
| Expiration Date | For consumables |
| Description | Detailed description |
| Notes | Internal notes |
Condition Status
Track the physical condition of each asset:
- Excellent — Like new
- Good — Normal wear, fully functional
- Fair — Shows wear but functional
- Poor — Needs attention
- Out of Service — Not safe to use
Asset Status
Track the operational status:
- Active — Available for use
- In Use — Currently assigned/deployed
- In Maintenance — Being repaired or serviced
- Retired — No longer in service
- Lost — Cannot be located
- Disposed — Removed from inventory
Asset Inventory
The agency's full asset list lives at Inventory in the left menu (previously labelled "Agency Assets"). Each row shows a 36px thumbnail to the left of the asset name — your uploaded asset image when present, or a per-category icon when not (vehicle, aircraft, watercraft, trailer, rescue equipment, communication, medical, tools, or other). Hover an image-bearing thumbnail to see a larger 240px preview.
Click any row to open the asset's read-only view; the pencil icon takes you straight to the edit page.
Compliance Dashboard
The new Compliance page (left menu, under the Assets section, sibling to Inventory) gives you an agency-wide view of inspection and maintenance cadence at a glance.
👉 Go to Assets → Compliance
KPI cards
Five cards across the top summarize the active fleet:
| KPI | Meaning |
|---|---|
| Overdue | Inspection or maintenance date is in the past |
| Due in 30 days | Due in the next 30 days |
| Due in 90 days | Due in 31–90 days |
| On Track | More than 90 days out |
| No Schedule | Neither inspection nor maintenance cadence is configured |
The KPI counts adapt to whatever filters you have applied, so you can drill into a slice of inventory without losing the headline.
Filter bar
| Filter | What it does |
|---|---|
| Status | Single-select to focus on one compliance bucket |
| Asset Type | Auto-populated from the loaded data |
| Capability | Life-Safety / Rope / Vehicle (gated on the asset type's tracking flags) |
| Search | Free-text across name, asset ID, agency asset ID, and type |
Filters combine with AND. A "Clear filters" button surfaces when any filter is active.
Grid
Each row shows the asset (with a thumbnail), type, last inspection, next inspection, maintenance due, days until due (formatted as "5 days overdue" / "Due today" / "32 days"), a color-coded status chip, and a per-row "View" action that deep-links to the asset's view page. The grid sorts by Days Until Due ascending by default so the most urgent rows surface first.
The Export CSV button generates a download of the currently-filtered set.
Compliance currently surfaces inspection and maintenance dates only. Registration, insurance, warranty, and lifecycle expiration tracking will fold in once their data flow is validated.
Asset Assignments
Track who has equipment and when it's returned.
Assigning Assets (Check Out)
Clicking the assign action on an asset opens a right slide-out drawer (520px wide on desktop, full-width on mobile).
- Open the asset
- Click Assign or Check Out
- Pick an Assignment Type:
- Member — assign to a team member
- Storage Location — assign to a facility / area / section / bin
- Mobile — assign to a vehicle, boat, trailer, or any storage-capable asset
- For storage and mobile assignments, drill down through the hierarchy. Storage labels show the full path (e.g.
🏢 HQ / 🚪 Bay 1 / 🗄 Section A / 📦 Bin 3) so you can see exactly where the asset is going. Mobile picks expand to show every level under each mobile asset, so you can deploy to a specific bin inside a vehicle, not just the vehicle root. - Add notes if needed
- Confirm assignment
Returning Assets (Check In)
- Open the asset or find it in assignments
- Click Return or Check In
- Update condition if changed
- Add notes about usage or issues
- Confirm return
Assignment History
Every assignment is logged with:
- Who checked it out
- When it was assigned
- When it was returned
- Condition before and after
- Any notes
QR Codes
Every asset gets a unique QR code for quick access.
How QR Codes Work
- Print the QR code label
- Attach it to the asset
- Scan with any smartphone
- View asset details, history, and actions
QR Code Benefits
- Quick Identification — Scan instead of searching
- Field Access — View details without a computer
- Assignment Updates — Check in/out from mobile
- Condition Reporting — Report issues on the spot
Generating QR Codes
- Open the asset
- Click View QR Code or Print Label
- Print on label paper or regular paper
- Attach to the asset
Maintenance & Inspections
Two complementary surfaces work together on every asset:
- Inspection & Maintenance (left rail on AssetEdit / AssetView) — configures when the next event is due. Holds the inspection interval, last inspection date, next inspection date, and maintenance due date.
- Log Book (left rail on every asset) — captures what was done. The actual entries log: inspections, preventive maintenance, repairs, calibrations, cleaning, service, and so on.
The two stay in sync automatically: saving a Log Book entry updates the matching cadence field on the asset (see "How Log Book entries drive cadence" below).
Inspection Scheduling
For assets that require regular inspections:
- Set the Inspection Interval (e.g., every 90 days)
- Record the Last Inspection Date
- RAM calculates the next due date
- Notifications alert before it's due
Log Book
The Log Book is a universal section on every asset, regardless of category or type. It captures the full audit-ready record of what's been done.
Adding an entry
- Open the asset (Edit or View)
- Click Log Book in the left rail
- Click Add Entry
- Fill in:
| Field | Description |
|---|---|
| Maintenance Type | Inspection, Preventive, Corrective, Repair, Calibration, Service, Overhaul, Replacement, Cleaning, or Other |
| Date (label adapts to type) | "Inspection Date" for Inspection, "Maintenance Date" otherwise |
| Performed By | An agency member, OR a free-text name for an external technician |
| Result | Pass, Pass-with-notes, Fail, Repaired, Replaced, Deferred, or Retired |
| Description | What was done |
| Findings | What was discovered |
| Parts Replaced | Free-text list of parts |
| Labor / Parts Cost | Decimals; total cost auto-fills on save |
| Next Due Date | Hidden for Cleaning / Other; "Next Inspection Date" for Inspection; "Next Maintenance Due" otherwise |
| Update asset schedule | Checkbox to write the next-due date back to the asset's cadence |
| Document | Photos, certificates, receipts, service reports |
A "Saving will update the asset" preview at the bottom of the form lists the exact cadence fields that will be written before you submit.
How Log Book entries drive cadence
Different entry types update different fields on the asset:
| Maintenance type | Updates on the asset |
|---|---|
| Inspection | Last inspection date (always); Next inspection date (when overridden) |
| Preventive / Corrective / Repair / Calibration / Service / Overhaul / Replacement | Maintenance due date (when "Next Due" is set and the schedule checkbox is on) |
| Cleaning / Other | No cadence change — these are record-only entries |
Filtering and audit response
The history table above the form has a filter bar with:
- Type (All / each maintenance type)
- Result (All / each result)
- Date range (From / To)
Filters combine with AND. The header label switches to "Log History (N of M filtered)" when any filter is active. An auditor request like "show me failed inspections in Q1" is a 30-second answer: Type = Inspection, Result = Fail, From = Jan 1, To = Mar 31.
Every row has a Print icon (visible in both edit and view modes). Clicking it opens a self-contained inspection or maintenance record in a new window — agency header, asset block, inspection details, free-text fields, costs, attached document URL, and signature lines for inspector + agency representative. Save as PDF via the browser's print dialog.
Rope-Specific Features
For technical rescue ropes (and any asset whose type has Tracks Rope Specs enabled), RAM also provides:
- Usage Logs — Track deployments and loads
- Inspection Records — Document visual and tactile inspections (use Log Book → Inspection)
- Retirement Criteria — Automatic alerts based on age or usage
- Fall History — Record any shock loads
Expiration Tracking
For assets with expiration dates (medical supplies, batteries, etc.):
Setting Up Expiration Tracking
- Ensure the Asset Type has Has Expiration enabled
- When creating the asset, enter the Expiration Date
- Configure notification timing in Asset Settings → Notifications
Expiration Notifications
RAM sends alerts before assets expire:
| Days Before | Alert Level |
|---|---|
| 30 days | Warning |
| 14 days | Urgent |
| 7 days | Critical |
| Expired | Overdue |
Customize notification timing and recipients for warranty, expiration, maintenance, and inspection dates in Agency Notification Settings.
Reports & Exports
Generate reports on your inventory.
Available Reports
- Full Inventory List — All assets with details
- Assets by Type — Grouped by category
- Assets by Location — Grouped by storage location
- Assignment Report — Who has what
- Expiring Soon — Assets needing attention
- Maintenance Due — Equipment needing service
Export Options
- CSV — For spreadsheets
- PDF — For printing or sharing
Best Practices
Naming Conventions
Use consistent, descriptive names:
| Good | Avoid |
|---|---|
| Radio Motorola XPR7550 #1 | Radio 1 |
| AED Philips HeartStart Main | AED |
| Rope PMI 11mm 200ft Blue | Rope |
Regular Audits
Schedule periodic inventory checks:
- Print current inventory list
- Physically verify each asset
- Update conditions and locations
- Report missing items
Training Your Team
Ensure all team members understand:
- How to check out equipment
- How to return equipment
- How to report issues
- How to scan QR codes
Troubleshooting
Common Issues
"Cannot create asset"
- Verify Asset Types are configured
- Check that Assets feature is enabled
"Asset type not available"
- Add the type in Asset Settings → Asset Types
"Cannot assign asset"
- Asset may already be assigned
- Check assignment status
"QR code not working"
- Ensure good lighting
- Try a different QR scanner app
- Verify the asset still exists
Related Documentation
- Agency Setup Guide — Complete setup checklist
- Agency Settings — Feature configuration
- Agency Notification Settings — Configure asset notification timing and recipients
- Team Management — Managing team members