Working with Assets
If your agency uses RAM's asset management feature, you can check out equipment, view what's assigned to you, and return items when done.
Viewing Available Assets
Browse Inventory
- Go to Assets → Inventory in the left menu
- Browse or search the equipment list
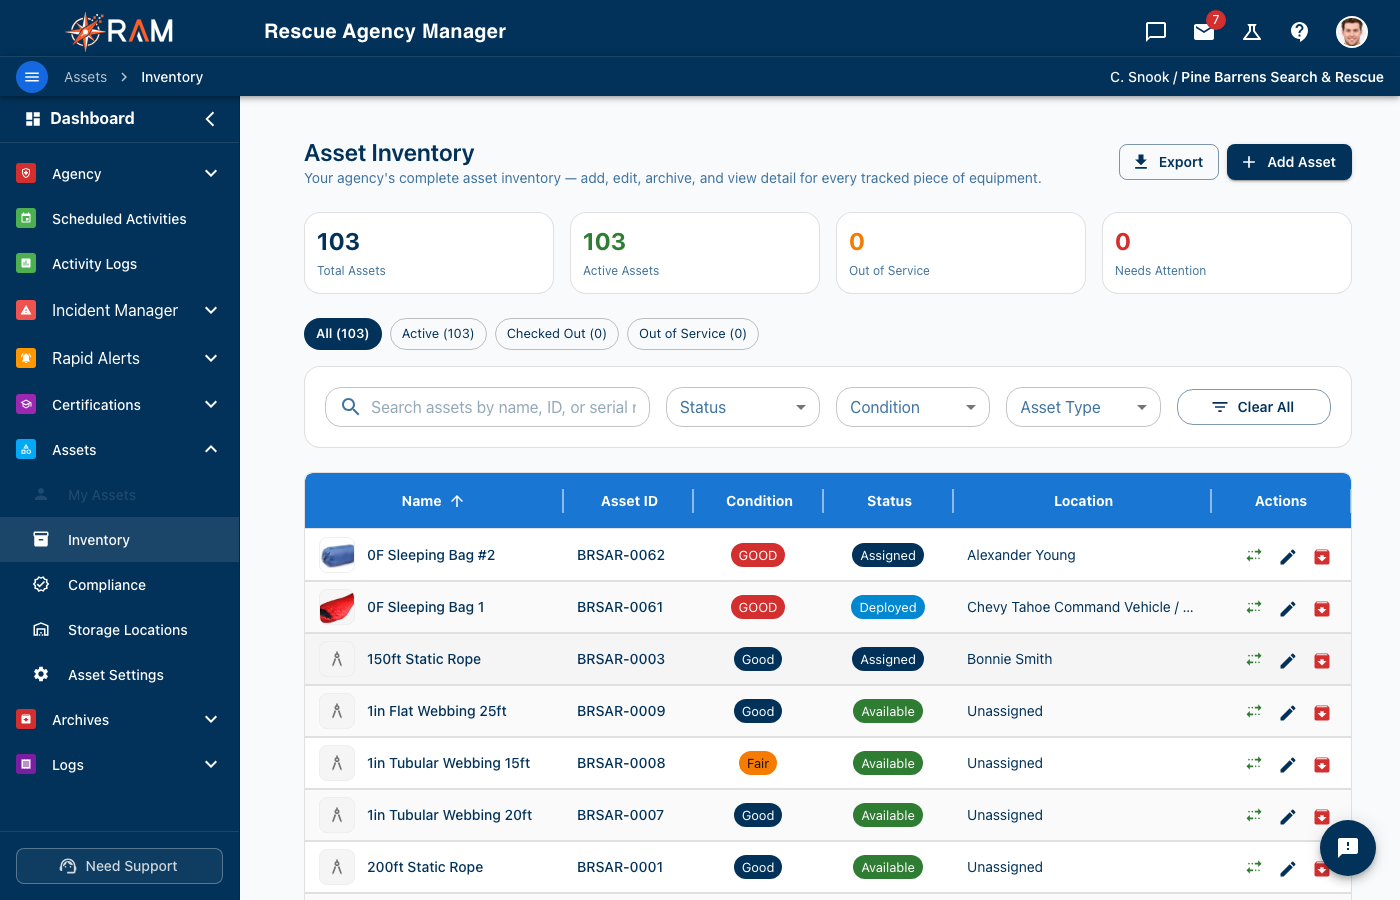
What You'll See
Each asset shows:
- A thumbnail to the left of the name — the uploaded asset image, or a category icon (vehicle, aircraft, watercraft, trailer, rescue equipment, communication, medical, tools, other) when no image is uploaded. Hover an image-bearing thumbnail to see a larger preview.
- Name — Description of the item
- Asset ID — Unique identifier (e.g., RADIO-001)
- Type — Category (Radio, Medical Kit, etc.)
- Status — Available, In Use, In Maintenance
- Location — Where it's stored
Click any row to open the asset's read-only view; a back button returns you to Inventory.
Filtering Assets
Use filters to find what you need:
- By Type — Show only radios, medical kits, etc.
- By Status — Available, assigned, etc.
- By Location — Specific storage areas
- Search — Find by name or ID
Compliance View
If you need to see what's overdue or due soon at a glance, go to Assets → Compliance. The page shows five KPI cards (Overdue / Due in 30 days / Due in 90 days / On Track / No Schedule) and a sortable grid that lists each asset's last inspection, next inspection, maintenance due, and how many days are left. The same thumbnails appear here too. Use the filter bar at the top to narrow by status, asset type, capability (life-safety / rope / vehicle), or free-text search. The "View" action on each row deep-links to the asset.
Checking Out Equipment
When you need to use equipment:
Step-by-Step
- Find the asset you need
- Click on it to open details
- Click Check Out or Assign
A right slide-out drawer opens with the assignment form. Pick the assignment type (Member, Storage Location, or Mobile), drill down through the hierarchy if applicable — storage labels show the full path so you can see exactly where you're assigning to, and Mobile picks expand to show every level under each vehicle/boat/trailer so you can deploy to a specific bin.
- Add notes if needed (optional):
- Purpose: "Training exercise"
- Expected return: "End of day"
- Confirm the checkout
What Happens
- The asset status changes to "In Use"
- It shows as assigned to you
- Your administrator can see who has what
- The assignment is logged with timestamp
Using QR Codes
If your equipment has QR code labels:
- Open your phone's camera (or QR scanner)
- Point at the QR code
- Tap the link that appears
- View asset details in RAM
- Check out directly from your phone
Viewing Your Assignments
My Assigned Assets
To see what's currently assigned to you:
- Go to My Profile → Assigned Assets
- Or check the Dashboard assignments widget
Assignment Details
For each assigned item, you'll see:
- Asset name and ID
- When you checked it out
- Asset condition
- Quick actions (return, view details)
Returning Equipment
When you're done with equipment:
Step-by-Step
- Go to My Assigned Assets or find the asset
- Click Return or Check In
-
Update condition if changed:
- Excellent — Like new
- Good — Normal wear
- Fair — Shows wear but works
- Poor — Needs attention
- Damaged — Requires repair
-
Add notes if needed:
- "Battery low"
- "Minor scratch on case"
- "Works perfectly"
-
Confirm the return
Where to Return
Your agency may have specific return procedures:
- Return to original storage location
- Return to a central check-in point
- Leave for an administrator to process
Check with your team for specific procedures.
Logging an Inspection or Service Entry
Every asset has a Log Book section in the left rail — the audit-ready record of every inspection, repair, calibration, cleaning, or service performed on it.
Adding an entry
- Open the asset
- Click Log Book in the left rail
- Click Add Entry
- Pick the Maintenance Type (Inspection, Preventive, Corrective, Repair, Calibration, Service, Overhaul, Replacement, Cleaning, or Other) — the form labels and date fields adapt automatically
- Fill in the date, who performed the work (you, another team member, or a free-text external technician name), the result, and any description / findings / parts replaced
- Add labor and parts costs if applicable — total cost auto-fills
- For inspections and most maintenance types, set the next-due date (or leave it for the cadence to pick up automatically). Cleaning and Other are record-only and don't change the asset's schedule
- Optionally attach a document (photo, certificate, receipt, service report)
- Save
A "Saving will update the asset" preview at the bottom of the form tells you exactly which cadence fields will change before you submit.
Filtering and printing
The history table has a filter bar (Type / Result / Date range) so you can narrow to a specific slice quickly — for example "all failed inspections from January through March". Each row has a Print icon that opens a self-contained inspection or service record you can save as PDF using your browser's print dialog.
Reporting Issues
If equipment is damaged or not working:
Minor Issues
- Open the asset details
- Click Report Issue or add to notes
- Describe the problem
- Complete your return (if returning)
Major Issues / Safety Concerns
- Stop using the equipment immediately
- Report to your supervisor/administrator
- Document in RAM with detailed notes
- Do not return to circulation without approval
What to Include in Reports
- What happened
- When you noticed the issue
- Whether it's still usable
- Safety concerns if any
Asset Conditions
Understanding condition ratings:
| Condition | Description | Action |
|---|---|---|
| Excellent | Like new, no visible wear | Continue use |
| Good | Minor wear, fully functional | Continue use |
| Fair | Noticeable wear, still functional | Monitor closely |
| Poor | Significant wear, may have issues | Report to admin |
| Out of Service | Not safe or functional | Do not use |
Updating Condition on Return
Always honestly assess condition when returning:
- It helps maintain accurate inventory
- Identifies equipment needing service
- Protects you from responsibility for pre-existing damage
Asset Types You May Encounter
Common equipment categories in rescue organizations:
| Category | Examples |
|---|---|
| Communications | Radios, repeaters, satellite phones |
| Medical | AEDs, first aid kits, oxygen equipment |
| Rescue Gear | Ropes, harnesses, litters, carabiners |
| Vehicles | Trucks, ATVs, boats (usually admin-managed) |
| Technology | GPS units, drones, cameras |
| Protective Equipment | Helmets, PFDs, turnout gear |
Tips for Equipment Use
Before Checkout
- Verify it's the right equipment for your need
- Check the condition before taking it
- Note any existing damage
- Ensure you're trained to use it
During Use
- Use equipment properly
- Report any issues immediately
- Don't modify or repair without authorization
- Keep track of where it is
On Return
- Clean equipment if appropriate
- Return all components (batteries, accessories)
- Honestly report condition
- Return promptly when done
Common Questions
Why can't I check out an asset?
Possible reasons:
- Asset is already assigned to someone
- Asset is in maintenance
- You don't have permission (ask your admin)
- Asset is retired or disposed
What if I need equipment for multiple days?
Just keep it assigned until you're done. Add notes about expected duration when checking out.
Can I check out multiple items?
Yes, you can have multiple assets assigned simultaneously. Check out each one separately.
What if I lost or damaged equipment?
- Report to your supervisor immediately
- Document in RAM with full details
- Follow your agency's procedures
- Do not try to hide or minimize the issue
Who can see my assignments?
- You can see your own assignments
- Administrators can see all assignments
- Other members may see that an asset is "In Use" but may not see who has it
Mobile Usage
RAM works on mobile devices for field use:
- View and search assets
- Check out equipment
- Scan QR codes
- Return items
- Report issues
Bookmark RAM on your phone for quick access in the field.
Related Documentation
- My Profile — View your assigned items
- Dashboard Overview — Quick access to assignments
- Getting Support — If you have problems