Running an Operation on a Map
An operation turns a map into a live workspace. People check in, teams get tasks, tracks come in, and everything is logged. Use it for a search, a training exercise or a team deployment that doesn't need a full incident.
Not sure whether you need an operation or an incident? See Operation or incident?.
For check-in in each situation, step by step, see How check-in works.
Starting, ending and promoting an operation takes Manage maps access. Most work during the operation takes Create / Edit map content. Members with Contribute add markers and clues and run the tasks they are on. The table at the end of this page lists every action.
Starting an operation
There are three ways to start one.
From a map you already built:
- In the Map Library, open the map's ⋮ menu and choose Start operation…. Or, with the map open, select the map's name in the top bar and choose Start operation….
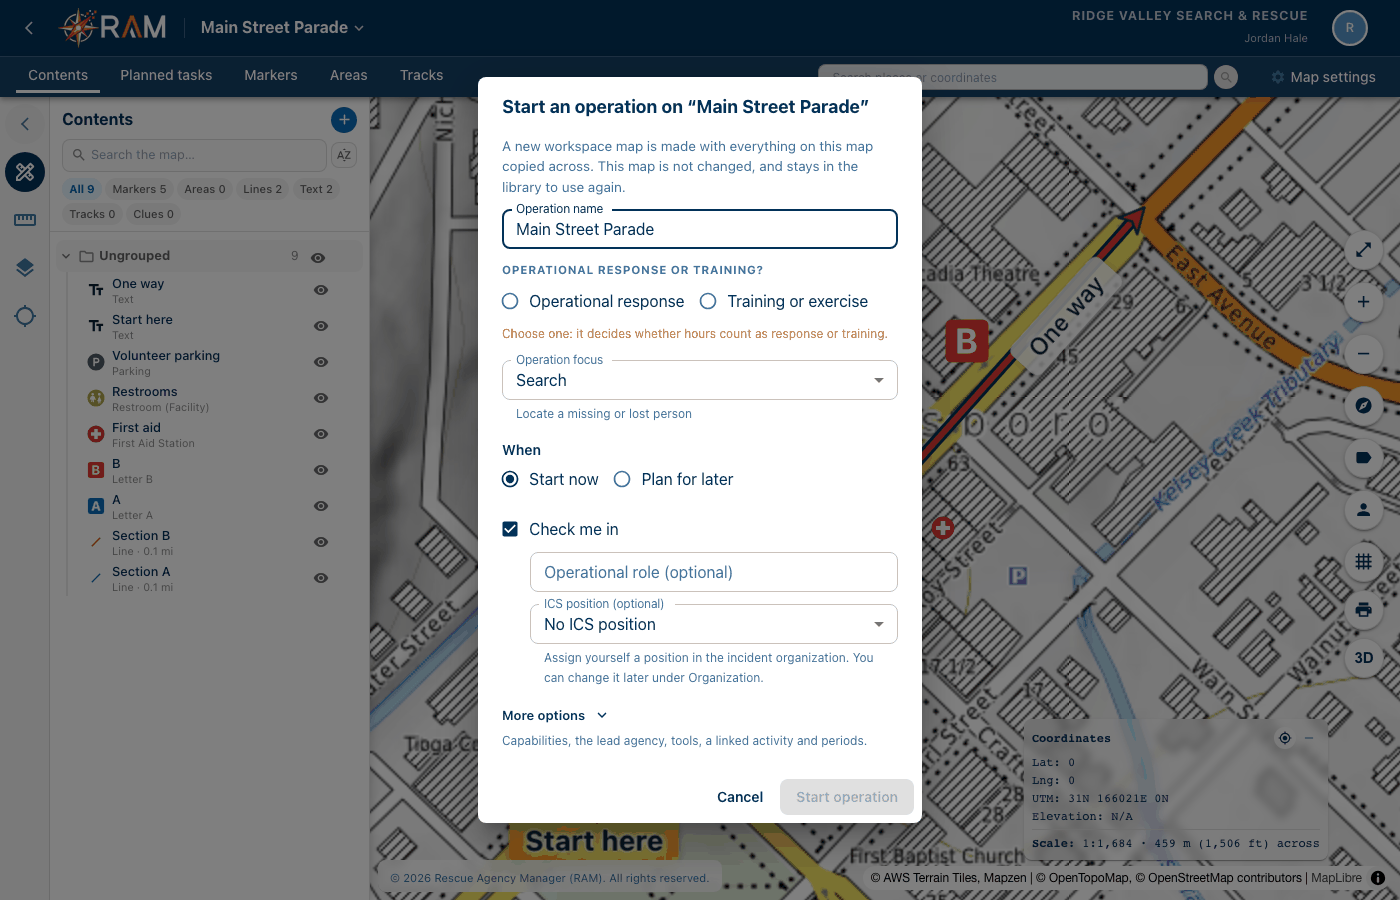
- Enter the Operation name. It starts as the map's name.
- Answer Operational response or training? It decides whether people's hours count as response or training hours, so there is no default.
- Choose the Operation focus: Search, Rescue, Recovery, Evidence search, Standby or support, Skills practice (training only) or Other. This sets which tools the operation starts with.
- Under When, keep Start now, or choose Plan for later. See Planning an operation for later.
- Leave Check me in ticked to be checked in as soon as it starts. Choose your Operational role and ICS position if you want. Both are optional. It isn't offered on a planned operation, or when a linked activity is the check-in.
- Open More options if you need any of these:
- Capabilities involved, such as K9 or Drone/UAS
- Additional details, if another agency runs the call. Choose Another agency, and enter the Lead agency and Their incident or mission number. See A deployment for another agency.
- Included tools. Select Customize tools to turn tools on or off. Tasks, teams and the log are always included.
- Linked activity, if members are checking in to a scheduled activity. They then check in once, and their hours are recorded in both places. It only shows when an activity is under way or starts within a week.
- Operational periods, to change the Period length and Changeover time
- Select Start operation (or Start training).
RAM makes a new working copy of the map, with everything on it and its planned tasks. Your original map doesn't change, so you can use it again. If the map is empty, the map itself becomes the operation.
From the Operations page: select New, then Start a map operation. Fill in the same window. RAM makes a new, empty map for the operation and opens it.
When you create a new map: in the Create map window, under Map use, choose Operation, and select Next. RAM makes the map, then opens the same Start an operation window.
Place the Command Post
Every operation needs its Command Post on the map. It is where the operation runs from, and where people check in. Until it is placed, a banner at the top of the map says Place the Command Post on the map, and the guide asks for it first.
- Select Place Command Post in the banner.
- Find the place. Use the map's search box, or zoom to it.
- Click the map where the Command Post is, and save.
If you don't know the exact spot yet, place it where you think it is. You can drag it later.
When another agency runs the call, the command post is theirs. The banner says Place where our team reports on the map, and places a Staging Area.
You can't run an operation on a template or a personal map. Create a map from the template first, or offer your personal map to the agency.
What you see once it starts
- the Check-In page, open, so you can check people in first
- an Active chip beside the map name
- on the top bar: the current period, the Incident Commander, how many people are checked in and how many tasks are out
- new tabs: Check-In, Tasks and Log, and the tools the work needs: Subject, Clues, Files and Plans
- a Guide button on the top bar, such as Guide · 1 of 9. It lists what to do next. See The guide.
- the map files itself under Agency › Operations, and shows on the Operations page as a Map operation
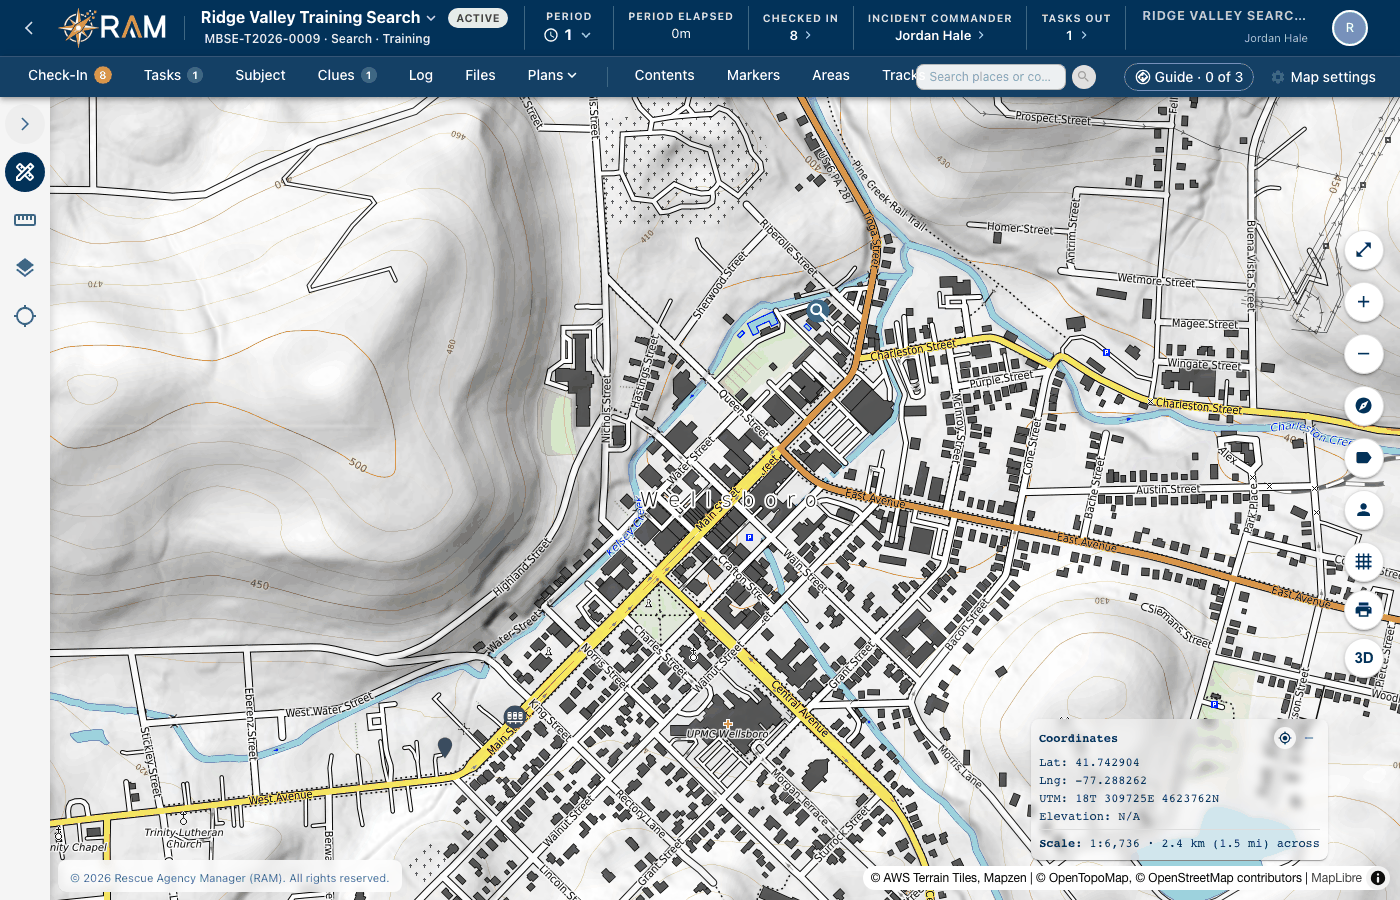
Select Incident Commander or Tasks out on the top bar to open its panel. If a full page such as Check-In is open, RAM goes back to the map first.
Planning an operation for later
Choose Plan for later when you start it, and set a Planned start. The planned start is a reminder only. Nothing starts by itself.
While it is planned:
- the map shows a Planned chip and a banner
- you can set up the map, write tasks, and write Period 1's objectives and its Incident Commander
- check-in, clues and the log stay closed until it starts
- people signed up for a linked activity show on Check-In as Expected
When people arrive, select Start operation in the banner, or choose Start operation… from the map's name. Period 1 starts then, with what you wrote.
Changing the operation's details
Select the map's name in the top bar and choose Operation details…. You can change the same answers you gave when starting it, including the tools. Turning a tool off hides it. Nothing on it is deleted.
Tools
An operation's tools decide which tabs and plans it has. Check-In, Tasks and the Log are always there. The others depend on the Operation focus you choose when you start it.
What each tool adds:
| Tool | What it adds |
|---|---|
| Subject | The Subject tab, with the subject questionnaire (LPQ) |
| Clues | The Clues tab, for what was found and what was decided about it |
| Areas | The Areas tab, for search areas and segments |
| Tracks | The Tracks tab, for live and imported tracks |
| Files | The Files tab, for the operation's files and photos |
| Radio plan | Radio plan, under the Plans tab |
| Organization | Organization, under the Plans tab, and the ICS position choice when someone checks in |
Which tools each focus turns on:
| Operation focus | Tools on |
|---|---|
| Search | Subject, Clues, Areas, Tracks, Files, Radio plan, Organization |
| Rescue | Subject, Areas, Files, Radio plan, Organization |
| Recovery | Subject, Clues, Areas, Files, Radio plan, Organization |
| Evidence search | Clues, Areas, Tracks, Files, Radio plan, Organization |
| Standby or support | Files, Radio plan, Organization |
| Skills practice | Files, Radio plan, Organization |
| Other | Files, Radio plan, Organization |
Every focus turns on Organization. That's why ICS position shows when you check in, unless you turn Organization off.
When another agency runs the call, Subject starts off. They take the subject interview. You can turn it back on.
To choose the tools when you start:
- In the Start an operation window, select More options.
- Look at Included tools. It lists the tools the focus turns on.
- Select Customize tools, and tick or untick each one.
To change them later:
- Select the map's name in the top bar, and choose Operation details….
- Select Customize tools, and tick or untick each one.
- Select Save.
Changing the tools takes Manage maps. Turning a tool off only hides it. Nothing on it is deleted, and turning it back on brings it all back.
A map's Map profile (Search & Rescue or General) decides which markers and drawing tools the map offers. It belongs to the map, not the operation. See Map settings and access.
The guide
The Guide button on the top bar opens a list of what to do next, in order. Essential items come first, then Recommended ones. Each item has a button that takes you there, such as Check people in or Write objectives. Select Skip for now to move to the next one. Nothing is blocked if you skip one.
The first time you open a new operation, RAM asks Need help getting started? Select Open guide, or Not now.
The guide follows the operation through these stages. It checks again every minute, so you don't need to reload.
| Stage | When | What it asks |
|---|---|---|
| Set up this operation | From the start, until teams go out | Check people in, choose the Incident Commander, write the objectives, fill in the subject questionnaire on a search, then the ICS positions, radio, search areas and the first task |
| Teams in the field | Once a team is out | Debrief teams that are back, send out teams that are assigned, give tasks to people who are free |
| Period change | The last hour before a period ends, once the operation is set up | Write the next period's objectives, and check its ICS positions and radio plan |
| Period change: close out | After a period ends with teams not yet debriefed | Debrief each team, then mark the period as debriefed |
| Close out | All teams are in | Finish or cancel tasks, check everyone out, end the operation |
| Plan this operation | While it is planned | Objectives, the Incident Commander, radio, search areas, tasks, then start it |
An item is only listed once it applies. For example, "Every team that is back is debriefed" appears once a team has been out.
Set up means the Command Post is on the map, people are checked in, there is an Incident Commander, and the objectives are written. On a search, the subject questionnaire too. Until then the guide stays on Set up this operation, even when the period is about to end.
For periods shorter than four hours, Period change starts in the last quarter of the period instead of the last hour.
A deployment for another agency
When another agency runs the call, your map records your own team:
- a banner says who runs the call, with their number
- the top bar shows your Team leader, not the call's Incident Commander
- Organization starts with one open ICS position, Agency/Organization Representative, and has a place for Their incident commander
- the Subject tool starts off. Turn it on under Operation details… if you need it.
Check-In: checking in and out
Select Check-In on the map bar, or the Checked in count at the top of the map. The Check-In page opens over the map. It shows the check-in places across the top, everyone Checked in by place, and who has Checked out. Select the arrow on a row to see that person's history. Use the search box and the All, Our members and Outside chips to find someone. Select Back to the map to close it.
Check-in works a little differently in each situation: a call-out from home, a training, a deployment. The top of the tab says how it works on this operation. For each situation step by step, see How check-in works.
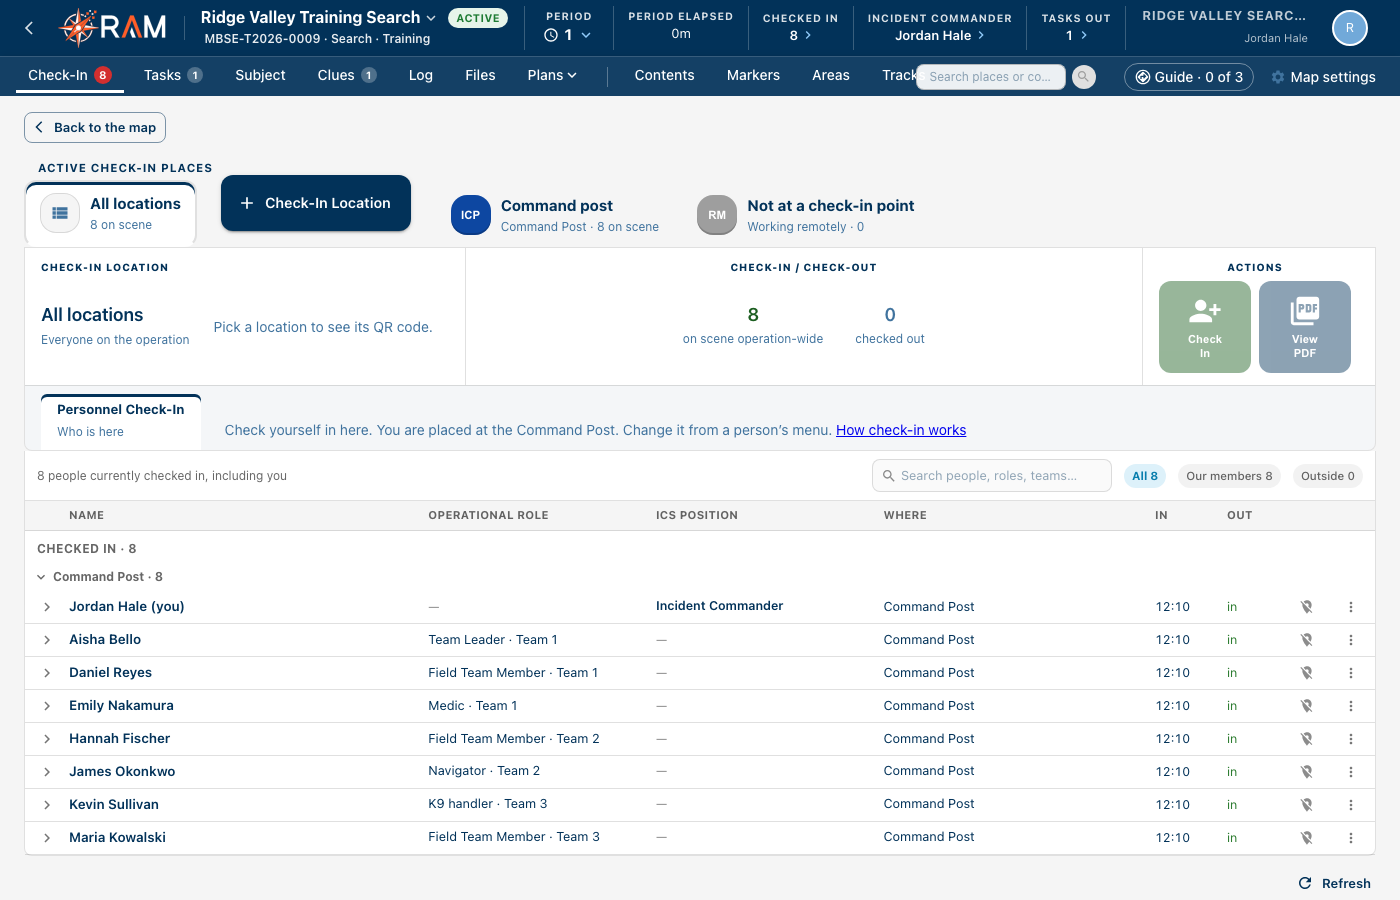
Check yourself in or out
- Open Check-In.
- Select the arrow beside Check in.
- Choose Check myself in or Check myself out.
- If the map has more than one check-in place, choose Where are you? and select Check in.
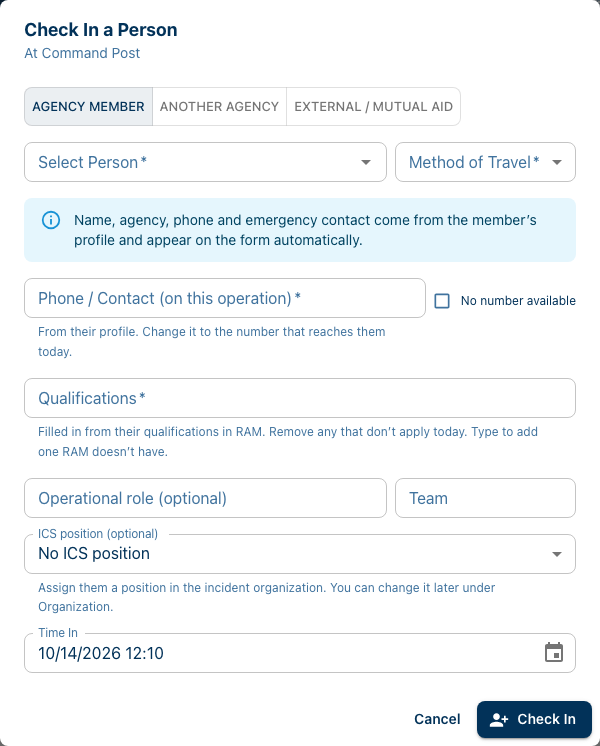
Check other people in
- Open Check-In, select the arrow beside Check in, then Check others in….
- Choose a tab:
- Our members: tick the people to check in.
- Another agency: enter the person's Email exactly and select Look up. RAM only finds people who have chosen to share their information with other agencies.
- No RAM account: enter their Name. Agency or group and Phone are optional.
- Enter a Role on the operation, such as Team Leader. It starts as Field Team Member.
- Enter a Team if you use them.
- Check Where they are. It starts as where you are.
- Select Check in (the button shows how many people).
Checking someone in doesn't give them access to the map or to your agency's data.
Change someone's check-in
Open the ⋮ menu on the person's row and choose:
- Check out, or Check in again
- Change operational role or team…
- Change location… to move them to another check-in place, or to working remotely
- Edit check-in times… to correct when they Checked in or Checked out. Leave Checked out blank while they are still out.
- Edit name, agency, phone… for someone with no RAM account
- Remove (checked in by mistake)… to take them off the list entirely. This also removes their service hours for the operation.
When the operation is linked to an activity
Members check in and out at the activity, and the Check-In list follows it. They are placed at the map's Command Post. Select Open its attendance to go there. People from outside your agency are still checked in on the operation, with Check in someone from outside….
Once the activity is over and everyone has checked out, the map asks whether to end the operation. See How check-in works.
Where people are
Every operation's map can have a Command Post, Staging Areas and Check-In Points. Add them from Markers, under Command. When someone checks in, they choose where they are, or Not at a check-in point if they are working remotely. Use Change location… on their row to move them. See How check-in works.
Locations on the map
A member who is checked in and sharing their location from the RAM mobile app shows on the map where their phone last reported, within the last hour. Select the location icon on their row to go there.
Subject
The Subject tab holds the subject questionnaire (LPQ): who is missing, what they look like, and where they were last seen. It is on for a search, rescue or recovery.
On the Contacts step, RAM fills in who is doing the interview, the date and time, and the Report Method. It picks In Person if you are checked in at a check-in place, and Phone if not. It only fills empty fields. Change anything that is wrong.
Planned tasks
Before an operation starts, plan its tasks on the map's Planned tasks tab.
- Open Planned tasks and select New planned task.
- Fill in the task as described under Creating a task. You can name members with Assign members. The team leader is picked once people check in.
- Select Create task.
When the operation starts, each planned task is copied onto it. Its search area comes with it, and its members stay assigned.
Tasks
Open the Tasks tab. Each task moves through five statuses: Pending, Assigned, In Progress, Completed and Canceled. Use the filter to show one status. Finished tasks are listed under Finished.
The tab's badge shows how many teams are out. It turns red when a team's PAR check is due.
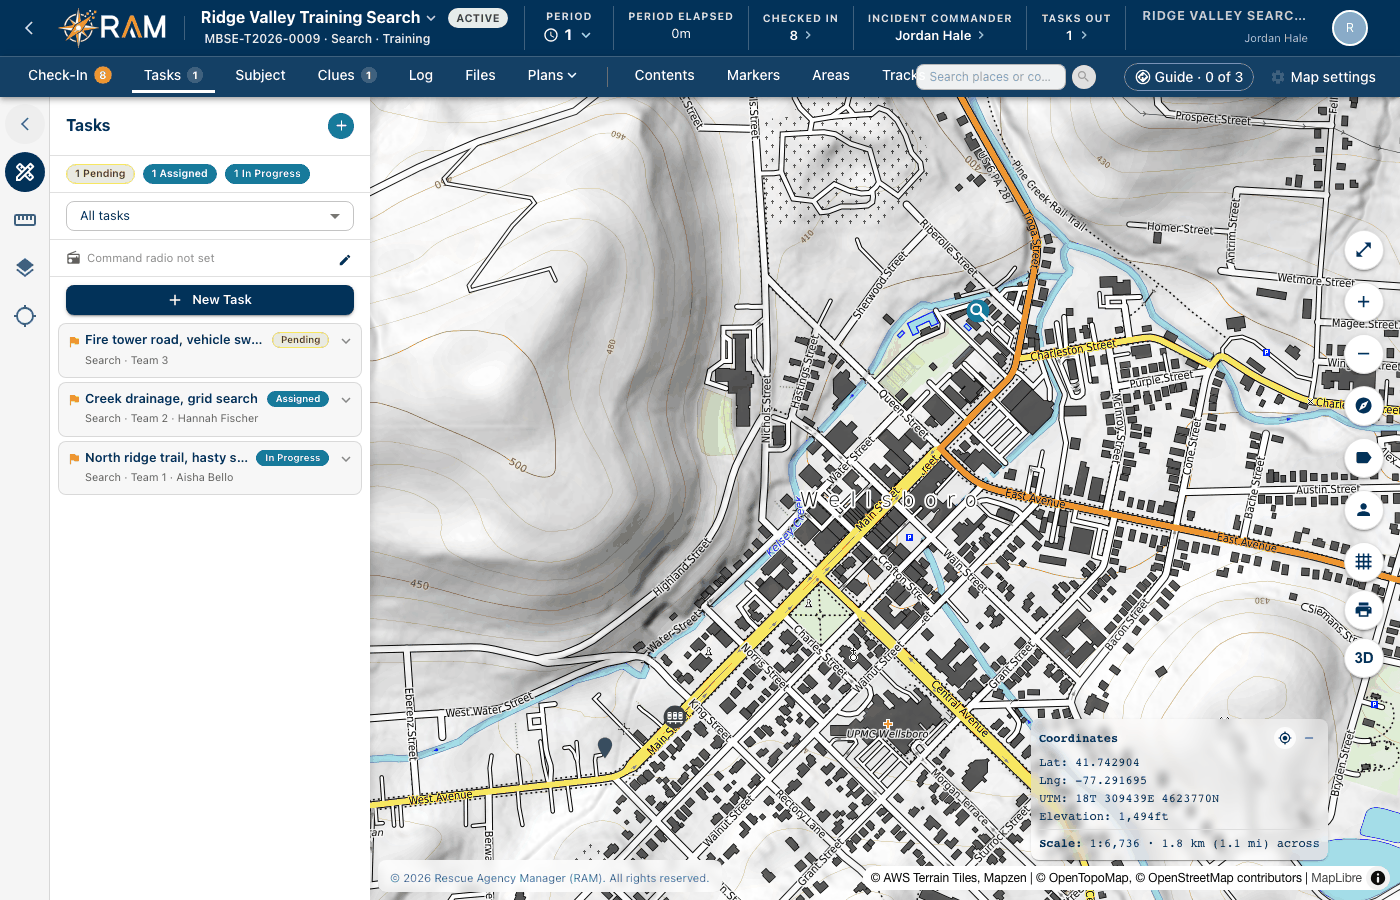
Creating a task
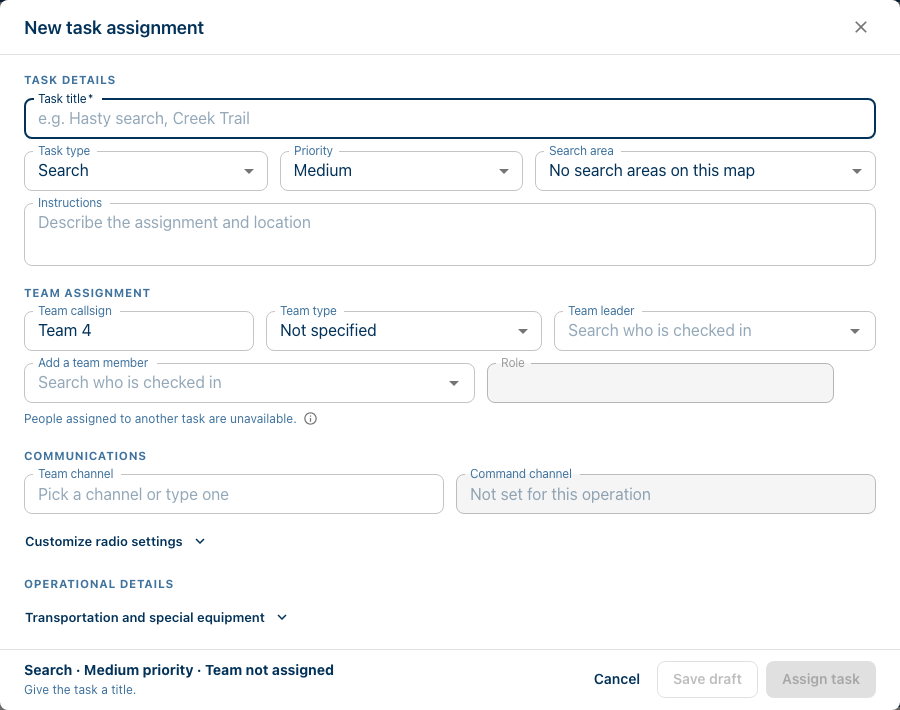
- Open Tasks and select New Task.
- Under Task details, enter:
- Task title (required)
- Task type, such as Search, Medical or Staging. If you choose Other, describe it.
- Priority: Low, Medium, High or Critical
- Search area, picked from the search areas on the map
- Instructions
- Under Team assignment, enter the Team callsign and Team type. Choose a Team leader and add members with Add a team member, each with a Role. Only people who are checked in can be picked, and each person can be on one task at a time.
- Under Communications, enter the Team channel. To use a different command radio for this task, open Customize radio settings.
- Under Operational details, open Transportation and special equipment if the team needs them.
- Select Assign task to send the team, or Save draft to keep it as Pending.
You need a team leader or at least one member before you can assign a task.
Running a task
Each task shows one main button for its next step. Find it on the task's card (select the arrow to expand it) or in View details.
| Status | Button | What happens |
|---|---|---|
| Pending | Assign task | The team is set and ready to go |
| Assigned | Start task | The team is out. The time out is recorded |
| In Progress | Complete task | The team is back. The time in is recorded |
To change the team, edit the task while it is Pending or Assigned. Once a task starts, its team is locked. You can still record its times and debrief.
Recording times and the debrief
- Select the pencil on the task's card. Once the task has started, it reads Record times and debrief.
- Open Times and debrief. Enter the Time out, Time in and the Debrief.
- Select Save changes.
Entering a Time in completes the task. RAM asks you to confirm with Save and complete.
PAR checks
If your agency sets a PAR interval in its incident settings, every task In Progress shows when its next PAR check is due. When one is overdue, the pill reads DUE, and an alert appears on the map.
- Select the PAR pill on the task's card.
- Enter how many of the team were accounted for, or choose All accounted for.
- Enter the Team's report.
- Select Record PAR. If you couldn't reach the team, select No contact.
Canceling or deleting a task
Open the … menu on the task's card. Choose Cancel task to keep it on the record as Canceled, or Delete task to remove it.
Printing a task sheet
Open the task with View details, then select the printer icon. RAM makes a PDF task sheet to hand to the team.
The command radio
The Command line at the top of the Tasks tab shows the command callsign and channel every task uses by default. Select the pencil to change them.
Operational periods
An operation is split into periods, 12 hours long by default. Periods roll over on their own schedule.
Viewing a period
Select the clock control at the top of the map. Choose Current period, All periods, or Choose periods… to tick the ones you want. When you view an earlier period, a banner says so. Select Return to current to go back.
Managing periods
- Select the clock control, then Manage operational periods….
- Select a period on the left. Each period shows Upcoming, Current, Ended or Debriefed.
- Enter its Objectives and choose the Incident Commander. Only someone checked in can be Incident Commander. Add Unified Command if others share command.
- To end the period earlier or later, change Ends. The next period starts when this one ends.
Changes save as you type. There is no Save button.
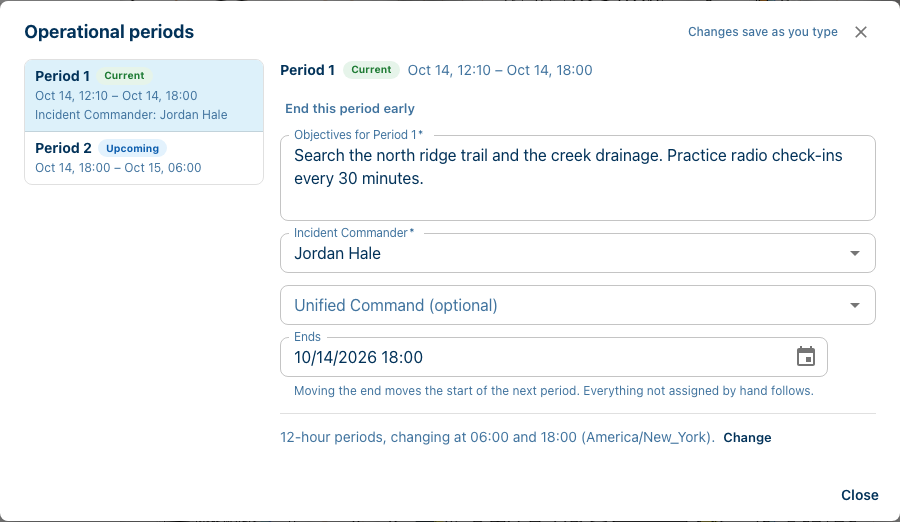
The next period is always ready ahead as Upcoming. You can write its objectives before it starts.
- To start the next period now, select End this period early on the current one, or Start this period now on the upcoming one.
- When a period's teams are all debriefed, it turns Debriefed by itself. You can also select Mark as debriefed.
- To change the schedule, select Change on the schedule line at the bottom. Set the Length and Starting at, then select Change from the next period. Periods that have already run keep their times.
When a period changes
A period changes by itself at its end time. You don't need to do anything, and you don't need to reload the map.
- The top bar shows the new period.
- The Incident Commander carries over, if they are still checked in. The log says "carried over". Anyone in Unified Command carries over the same way. If you chose someone for the new period ahead of time, they are kept.
- The new period's objectives are its own. Write them before the change. The guide asks for them in the last hour.
- Organization and the Radio plan start as a copy of the last period. Check them.
- If no team went out in the period that ended, it is marked Debriefed straight away. If teams went out, the guide lists each one to debrief. When they all are, the period turns Debriefed by itself.
A period that starts very close to a changeover can be short. For example, an operation started at 17:55 with periods changing at 18:00 has a five-minute Period 1.
Handing over the Incident Commander
Choose someone else as Incident Commander for the current period. RAM asks Hand over to …? Add a Handover note if you want, then select Hand over. The note goes in the log, and the new person gets a notification.
If the Incident Commander checks out, RAM asks Who takes over? first. See When the Incident Commander leaves.
Items that belong to one period
When you add or edit a marker or area, open Operational period in its editor. Choose the period it belongs to, or turn on Visible in all periods. The command post, staging area, PLS and LKP are always visible in all periods.
Plans: Organization and the radio plan
The Plans tab on the map bar opens a short list of the operation's plans. Each opens in the left panel. Both are kept one period at a time. Choose the period at the top of the panel. A new period starts as a copy of the last.
Changing a plan takes Manage maps access, or being Incident Commander of that period. Everyone else can read it.
Organization
Organization shows the Incident Commander, and who holds each ICS position, by section. A new operation starts with four open positions: Safety Officer, Operations Section Chief, Planning Section Chief and Logistics Section Chief. A training also starts with an open Instructor, and offers Evaluator and Role player.
- To fill an open position, select Assign and pick someone checked in.
- To add another position, select + and choose it from the list. Some need a name, such as "Division A".
- To change the Incident Commander, select Change under Incident Commander. To add others who share command, select Add Unified Command and pick one or more people.
Only someone checked in can hold an ICS position. When they check out, the position shows as open again, with who had it.
An ICS position is a seat in the incident organization. An operational role on Check-In, such as Team Leader, is what someone is doing on this operation. One person can have both. Neither is a qualification, which comes from their certifications.
Radio plan
The Radio plan lists the channels for the period: What it's for, Channel, Receive (MHz), Transmit (MHz), Tone, Mode, Who uses it and Remarks, plus Special instructions.
- The base radio's channel and each team's channel show here, but you change them where they were set: on the base radio, or on the task.
- To add a channel of the plan's own, select +.
Changes show on everyone's screen straight away.
The log
The Log tab records what happened, grouped by period, newest first.
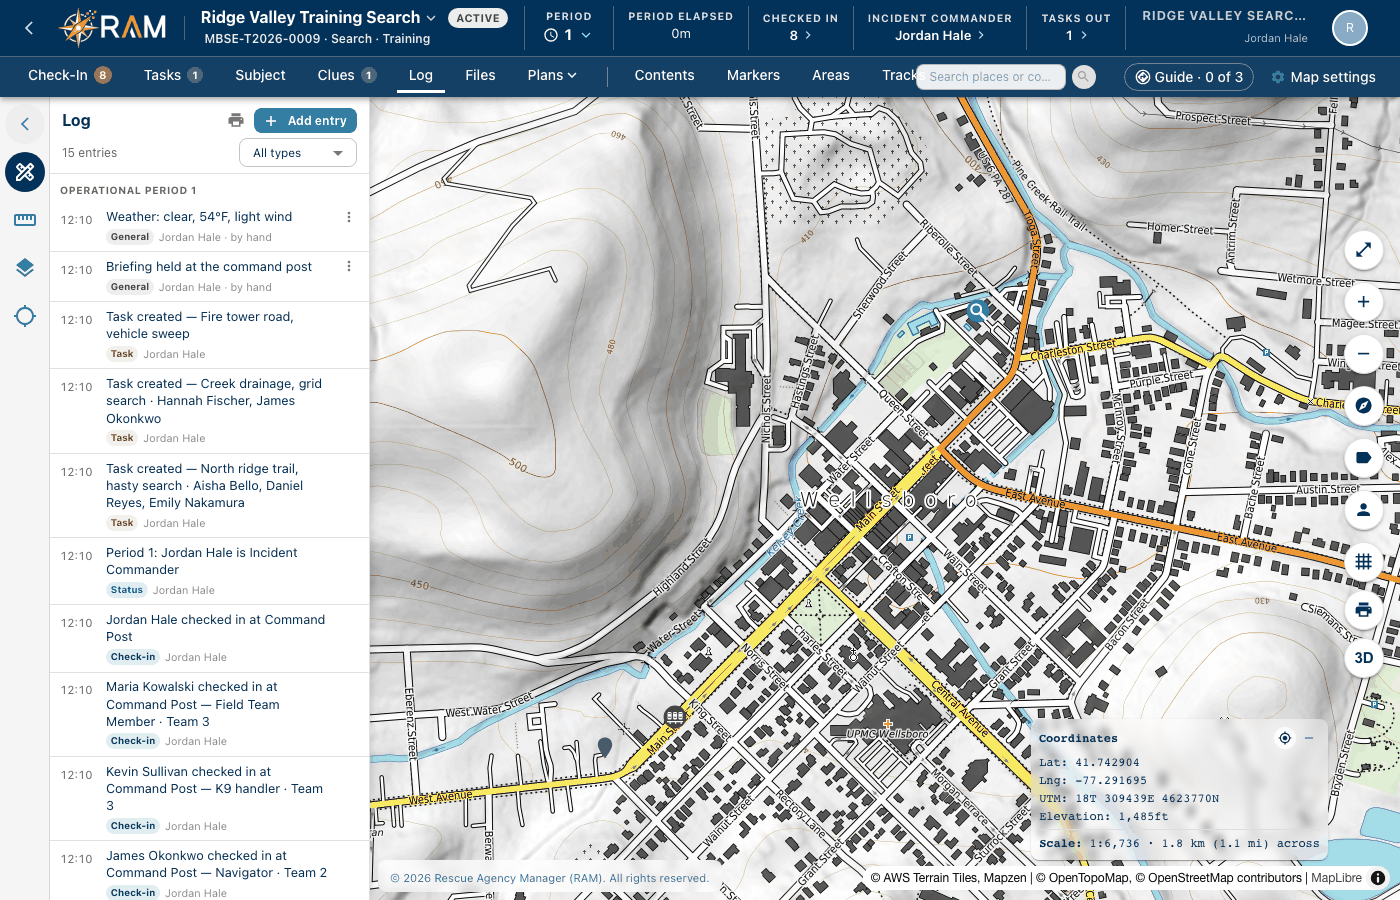
RAM adds these entries for you:
- the operation starting, ending and reopening
- each person checking in and out
- tasks being created, assigned, started, completed and canceled
- PAR checks
- changes to the period schedule
- someone moving to another check-in place
- changes of Incident Commander, with any handover note
- ICS positions given and ended in Organization, and radio plan changes
- a marker being restricted to some people, or opened to everyone
Adding an entry
- Open Log and select Add entry.
- Enter What happened, When, and the Type.
- Select Add.
To change or remove an entry you typed, open its ⋮ menu and choose Edit… or Remove. Entries RAM made can't be changed.
Use the filter to show one type of entry. Select the printer icon to print the log as a PDF.
Clues
The Clues tab is on for a search, a recovery and an evidence search. Turn it on for other work under Operation details….
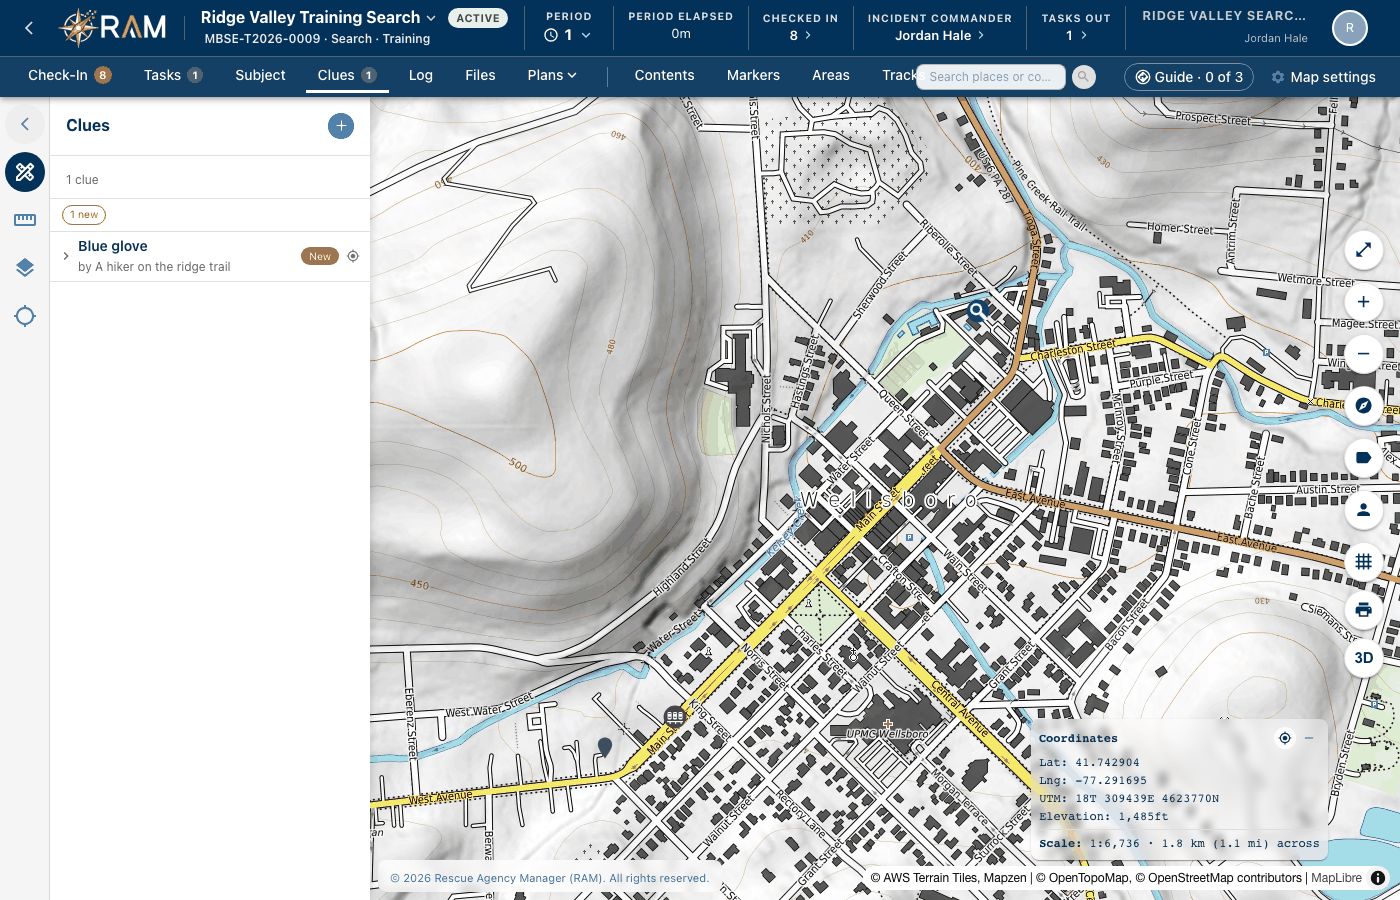
Recording a clue
- Select + on the Clues tab, or choose Clue from Add to map.
- Place it on the map.
- Under Clue details, enter What was found, Found by, Found at and the Status.
- Select Save.
Updating a clue
Open the clue's row on the Clues tab. Change its Status (New, Evaluated, Relevant or Not relevant), and record the Disposition: what was decided about it, and why. Add photos with Add a photo. Select Save.
If someone outside your team found it, such as a hiker, enter them under Found by (not a member).
Tracks
The Tracks tab lists every track, grouped by task.
- Live tracks come from members recording with the RAM mobile app. They draw as the member moves.
- Imported tracks come from a GPS, watch or phone file.
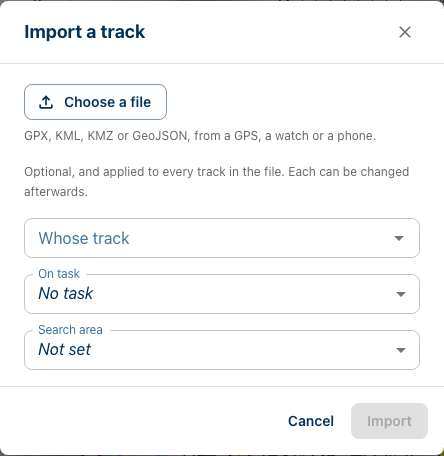
Importing a track
- Open Tracks and select Import.
- Select Choose a file. GPX, KML, KMZ and GeoJSON files work.
- Choose Whose track it is, which task it was On, and the Search area. These apply to every track in the file.
- Select Import.
Changing a track
Use the controls on the track's row:
- the color dot to Change color
- the eye to Hide or Show it
- Fly to it to zoom to it on the map
Imported tracks also have a ⋮ menu:
- Edit name, member, task to change its Track name, Whose track, On task or Search area
- Edit the points to move, delete, trim, split or merge points. Select Save when done.
- Remove to take it off the map and the record. The file it came from isn't affected.
You can also right-click a track on the map for these options.
Files
The Files tab holds the operation's own files, its photos from the map and the subject, and the agency's operations documents. To add one, select Add file to operation. Files saved here stay with the operation, not in the agency's library.
Printing and importing
- Print to scale: select the map's name in the top bar, then Print to scale…. See Working on the map.
- Import a map file: from CalTopo, SARTopo, GPX, KML or KMZ. Select the map's name in the top bar, then Import a map file…. Choose Into this map or As a new map, check the list on the Review step, and import.
Photos can be added to markers and clues. They also show on the Files tab.
Lock Agency Access
Use this on a shared laptop or tablet, for example at the command post. It keeps the screen on this map. Nobody using it can open agency pages or account settings.
The Lock Agency Access button is on the map's top bar, after Tasks out. It shows only while the operation is active. On a narrower screen it reads Lock Access.

Locking
-
Select Lock Agency Access on the top bar.
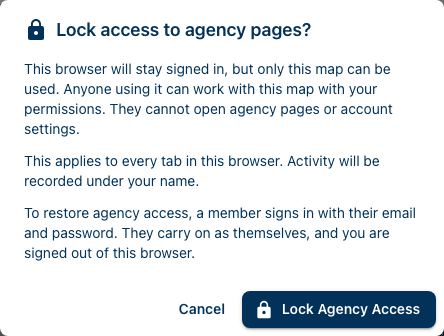
- You should see: Lock access to agency pages?
-
Read what it says, then select Lock Agency Access.
- You should see: the map again. The button now reads Agency Access Locked, in amber.
While it is locked:
- only this map can be used in this browser, in every tab
- anyone using it works with your permissions on this map
- everything they do is recorded under your name
Unlocking
- Select Agency Access Locked on the top bar. Or select your name at the top right, then Unlock Agency Access.
- You should see: Unlock Agency Access, asking for an email and password.
- Enter a member's email and password, then select Unlock.
- You should see: the map, with agency pages open again.
The member who signs in carries on as themselves. You are signed out of that browser.
Ending an operation
Everyone must be checked out, and no team can still be out on a task.
On an operation linked to a scheduled activity, the map asks Everyone has checked out. End the training? (or End the operation?) once the activity is over and everyone is out. Select End, or Not now. It never ends by itself.
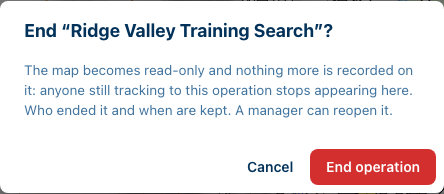
- Select the map's name in the top bar.
- Choose End operation….
- Select End operation.
You can also end it from the Operations page.
The map becomes read-only, and nothing more is recorded on it. Members still tracking to it stop appearing. Any sharing links to people outside your agency are closed.
To undo this, select the map's name and choose Reopen operation.
Archiving an operation
Once an operation has ended and you no longer need it in the library, archive it:
- In the Map Library, open the map's ⋮ menu and choose Archive. Or select the archive icon on its row on the Operations page.
- Confirm.
The map is kept for good, read-only, under Archives › Maps.
Promoting to an incident
If an operation grows into a full incident, promote it. The operation keeps everything it has, and gains an incident number, the ICS forms and the command console.
- Select the map's name in the top bar, then Promote to incident….
- Enter the Incident name and choose the Incident type. A training operation always becomes a training incident.
- Check Reported at: when the call came in. It starts as the time the operation started.
- Enter the Initial report if you have one.
- Select Promote to incident.
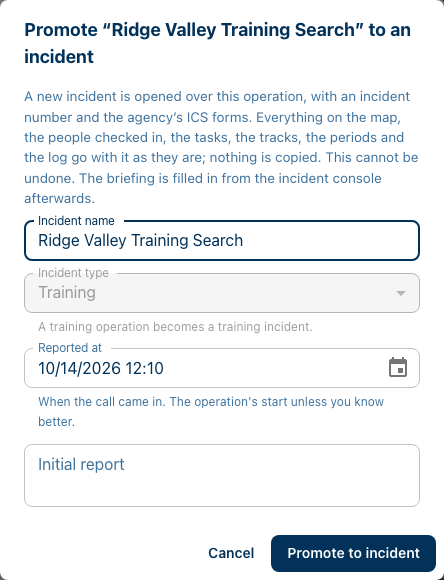
This can't be undone. You land on the new incident's command console. See Running an incident.
Promoting takes Manage maps and Create incidents access. It can't be done if the map has more than one command post, PLS or LKP.
Who can do what
Each map access level includes the ones above it in this table.
| Action | Needs |
|---|---|
| View the operation | View |
| Check yourself in or out | Contribute |
| Add markers and clues, and change your own | Contribute |
| Start, complete and take the PAR on a task you are on | Contribute |
| Add photos | Contribute |
| Create, edit, assign, cancel and delete tasks | Create / Edit map content |
| Add to the log, and edit or remove typed entries | Create / Edit map content |
| Import, edit and remove tracks | Create / Edit map content |
| Draw areas, lines and text, and place the command post, staging, PLS and LKP | Create / Edit map content |
| Delete anything, your own items included | Create / Edit map content |
| Start, end and reopen an operation | Manage maps |
| Manage operational periods | Manage maps |
| Change the operation's details and tools | Manage maps |
| Change Organization and the radio plan | Manage maps, or being Incident Commander of that period |
| Archive an operation | Manage maps |
| Promote to an incident | Manage maps and Create incidents |
| Check other people in, and edit or remove check-ins | Manage incident check-ins |
| Change the Incident Commander | Manage maps, or being Incident Commander of that period |
Agency admins can do everything. See Map settings and access for how levels are given.